Developer Guide
Table of Contents
Setting up, getting started
Refer to the guide Setting up and getting started.
Design
Architecture

The Architecture Diagram given above explains the high-level design of the App. Given below is a quick overview of each component.
Tip: The
.pumlfiles used to create diagrams in this document can be found in the diagrams folder.
Main has two classes called Main and MainApp. It is responsible for,
- At app launch: Initializes the components in the correct sequence, and connects them up with each other.
- At shut down: Shuts down the components and invokes cleanup methods where necessary.
Commons represents a collection of classes used by multiple other components.
The rest of the App consists of four components.
UI: The UI of the App.Logic: The command executor.Model: Holds the data of the App in memory.Storage: Reads data from, and writes data to, the hard disk.
Each of the four components,
- defines its API in an
interfacewith the same name as the Component. - exposes its functionality using a concrete
{Component Name}Managerclass (which implements the corresponding APIinterfacementioned in the previous point.
Implementation
This section describes some noteworthy details on how certain features are implemented.
Add Plan feature
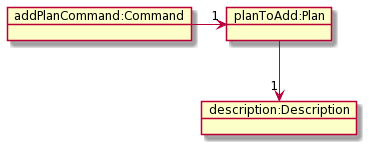
The addp command makes use of the Plan class to add a plan to the user’s list of plans. The user must provide a valid Description for the plan, otherwise they will be prompted to do so.
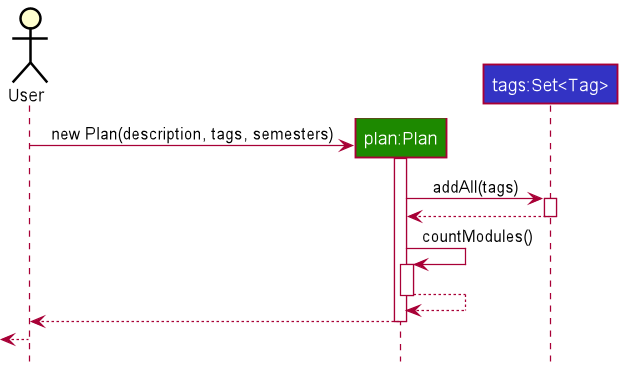
Constructor:Plan#new(Description description, Set<tag> tags, List<Semester> semesters)
Creates a Plan object using the plan’s description, its relevant tags as well as a list of semesters to include.
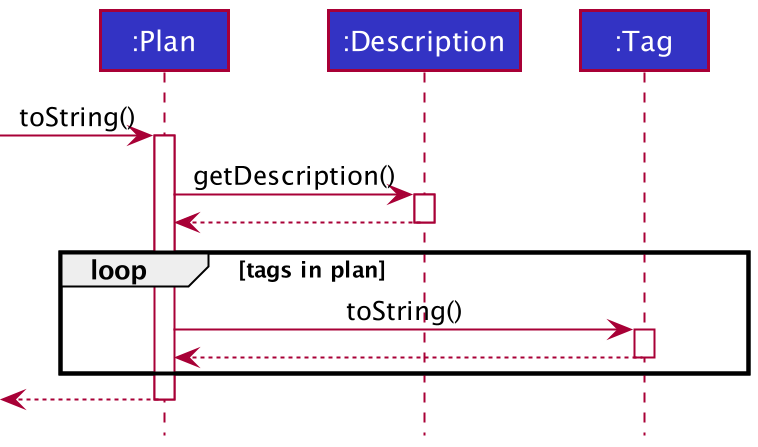
Method:Plan#toString()
Builds a formatted string by appending the plan’s description as well as all of its tags.
The getDescription method is used to obtain the Description in String format.
Each Tag’s toString() method is called.
Overview: Add Plan command
The following presents a final overview of how the addp command is used:
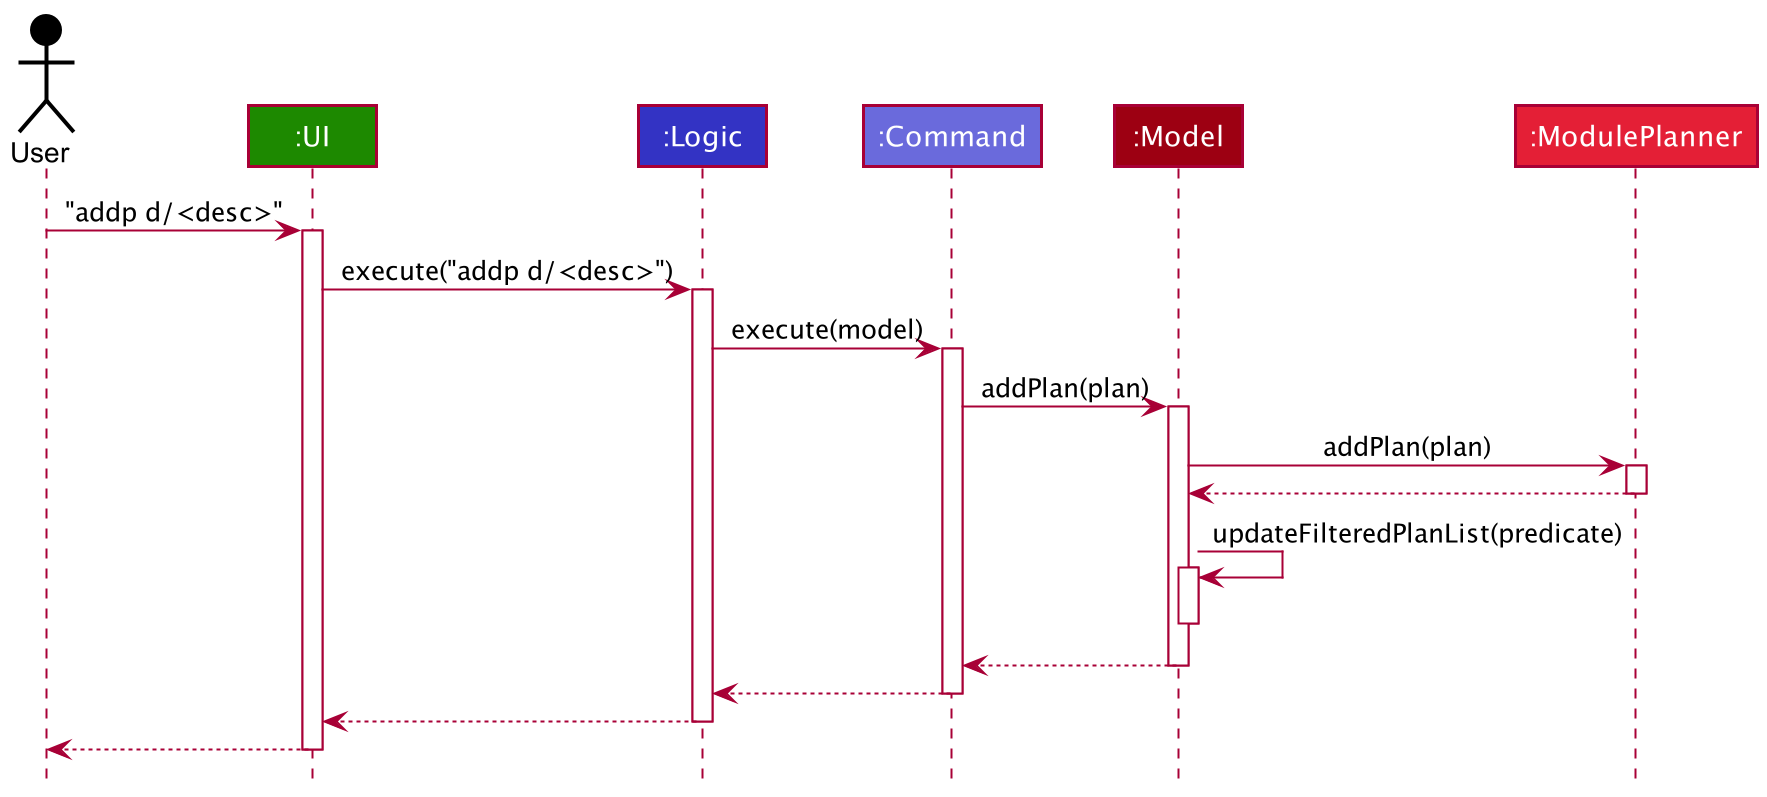
Do note that the current implementation always creates a new Plan instance whenever the addp command is provided by the user, to ensure that users create a new plan.
Add Module to Semester Feature
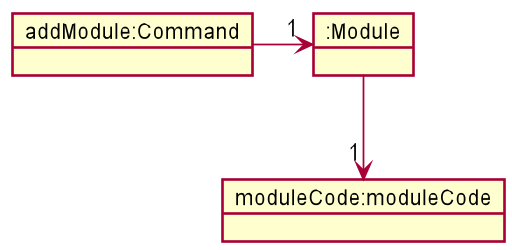
The addm command makes use of the Module class to add a module to the user’s choice of plan and semester. The user must provide a valid Plan Number, Semester Number and Module Code, otherwise they will be prompted to do so. Here, if the user input the module with grade behind, model will note down the grade and use the grade to calculate user’s CAP Otherwise, the module will be mark as undone.
Constructor: Plan#new(String ModuleCode, String ModuleTitle, int MCs,
Overview: Add Plan command
The following presents a final overview of how the addm command is used:

History feature
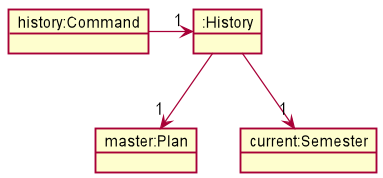
The history command makes use of the History class to format information about semesters prior to the users current semester in their master plan. As such, a precondition for the history command is that the user must have identified both a master plan and current semester, otherwise they will be prompted to do so.

The History class is a helper class that extends HashMap and implements two methods, a constructor and a toString method. The following explains the functionality that each method provides and how they are implemented:
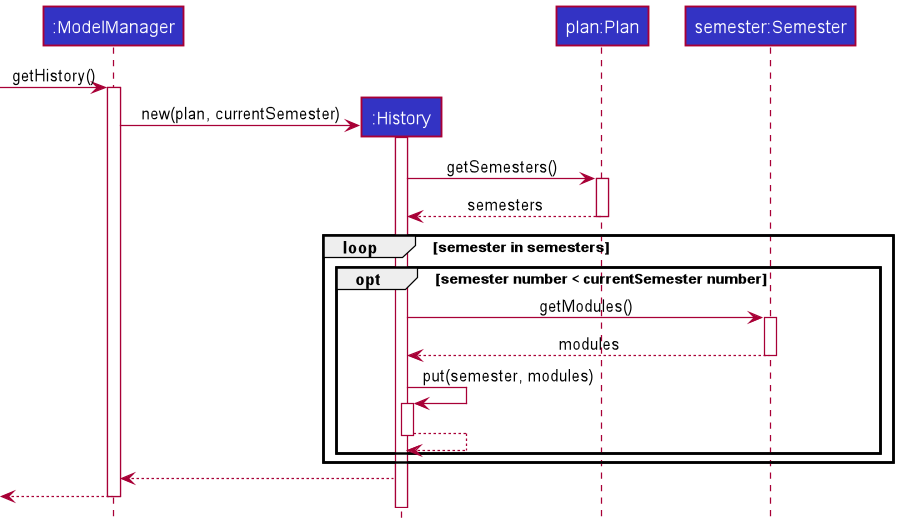
Constructor:History#new(Plan p, Semester current)
Creates a History object (a subclass of HashMap) using information about semesters from the Plan p up until the current semester. The keys to the HashMap are the prior semesters each corresponding value is a List of modules that were done in that semester.
Method:History#toString()
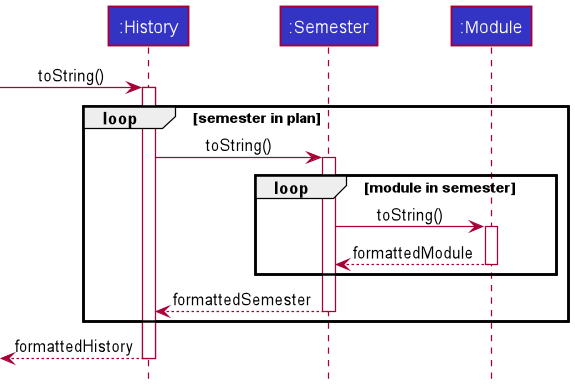
Builds a formatted string by iterating over each of the semesters stored as keys in the HashMap according to their semester number and in ascending order.
Each semester’s toString() method is called which internally calls each modules toString() method.
Overview: History command
The following presents a final overview of how the history command is used:
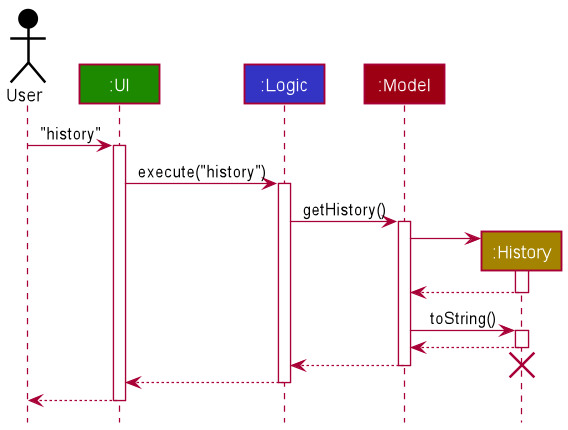
Do note that the current implementation always creates a new History instance whenever the history command is provided by the user, to ensure that users are presented with their most updated information.
Validate feature
The validate command looks at all modules from the master plan, specifically all semesters from the first to current. Every other plan is then looked at the same way up to whatever semester that current is set to. For example, if current is set to semester 5, validate takes the first 5 semesters of modules from the master plan and compares it to every other plan. If the other plans have every module that was found in the master plan, it is valid.
Overview: Validate command
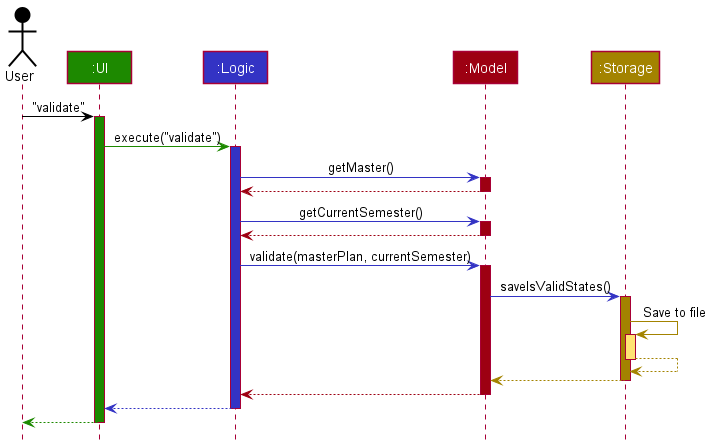
The validate command makes use of the ModelManager class which contains the necessary list of plan objects, which contains the relevant semester and module objects. After accessing the ValidateCommand logic component, if master and current is set, the ModelManager is accessed.
State Diagrams
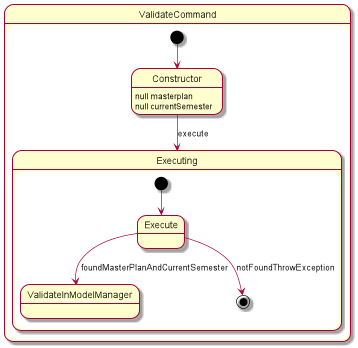
The validate command does not create other objects. It initializes with a null masterPlan and currentSemester, and updates them in the execute() method, throwing exceptions if they have not yet been set. If set successfully, validation continues.
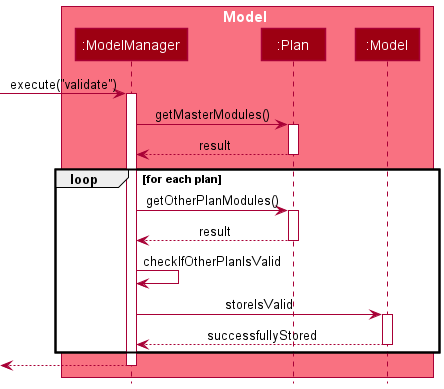
In the ModelManager, the validate(masterPlan, currentSemester) method references every other existing Plan from the base master plan. The method then sets whether or not they are valid.
[Proposed] Validating using History object
Currently, validate checks each plan up to their semesters for the taken modules. This is rather slow since it has to loop through the modules. This can be done much faster using the HashTable which is provided by the History object. Although not currently a necessary feature since only a single user uses the application, this is a rather simple optimization that should be implemented.
Info feature
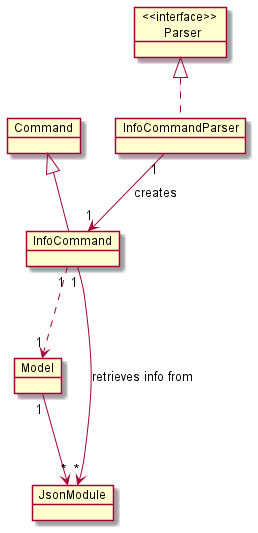
The InfoCommandParser reads the user input and creates a InfoCommand to execute with the any arguments found.
The InfoCommand makes use of the JsonModule class to retrieve module information stored in json format to
display relevant information to the user.
InfoCommandParser
Method:parse(String args)
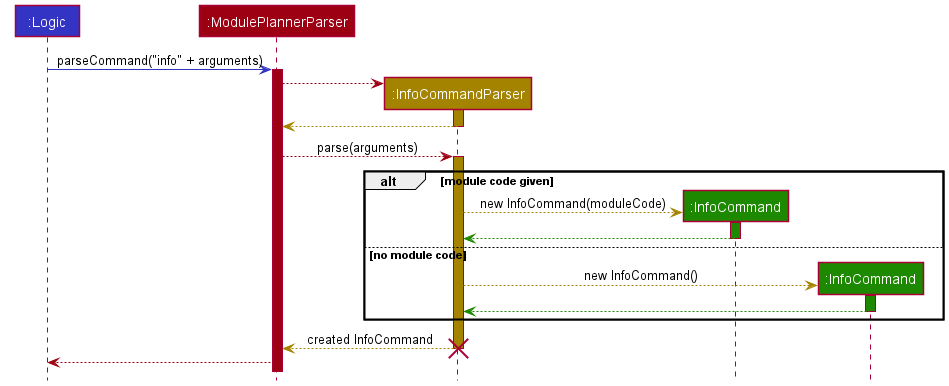
After ModulePlannerParser removes the command word from the user input, InfoCommandParser
extracts the module code if found and creates an InfoCommand object with the module code otherwise
an InfoCommand object with no module code.
The created InfoCommand object is returned to Logic object for execution.
InfoCommand
Method: execute(Model model)
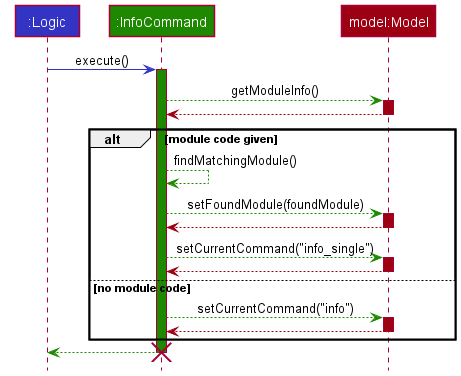
InfoCommand object retrieves all module information from Model object stored in JsonModule
object. Based on what arguments the InfoCommand object is created with, it finds the relevant
JsonModule object and sets it for the Model object foundModule field. Lastly, the currentCommand
field is updated for the UI to show a single module information or all of them.
Appendix: Requirements
Product scope
Target user profile:
- NUS students
- has a hard time organising and planning what modules to take
- prefer desktop apps over phone apps
- can type fast
- prefers typing to mouse interactions
- is reasonably comfortable using CLI apps
- want to have a good way to check all MCs
- wants to have a good way to check all fulfilled pre-requisites
- wants to have a good way to plan for all their modules
Value proposition:
- managing study plan is much easier than existing choices (i.e. WHAT-IF report)
- planning for modules is more automatic/convenient than manual inputs
User stories
Priorities: High (must have) - * * *, Medium (nice to have) - * *, Low (unlikely to have) - *
| Priority | As a … | I can … | So that I can… |
|---|---|---|---|
* * * |
new user | see usage instructions | refer to instructions when I forget how to use the App |
* * * |
student user | have multiple study plans | prepare for different study scenarios in university |
* * * |
student user | add multiple semesters to a plan | create plans that involve multiple semesters |
* * * |
student user | add multiple modules to a semester | plan for what modules i want to do in a given semester |
* * * |
student user | delete a study plan | remove plans that i no longer need |
* * * |
student user | delete a semester from a plan | remove semesters that i no longer need |
* * * |
student user | delete a module from a semester | remove modules that i no longer need |
* * * |
student user | view summary information of a plan | conveniently understand the plan without having to open it |
* * |
student user | check if my plan contains 160MCs | know whether my plan allows me to graduate |
* * * |
student user | view a module’s prerequisites | know what modules need to be done before hand |
* |
forgetful student | add and view grades of past modules | keep track of how well i did for different modules without remembering |
Use cases
(For all use cases below, the System is the NUS Module Planner and the Actor is the user, unless specified otherwise)
Use case: Add a plan
MSS
- User requests to add a plan
-
NUS Module Planner shows result
Use case ends.
Extensions
-
2a. The given plan number already exists.
- 2a1. NUS Module Planner shows an error message.
Use case ends.
-
3a. The given plan number is invalid.
- 3a1. NUS Module Planner shows an error message.
Use case ends.
Use case: Delete a plan
MSS
- User requests to list plans
- NUS Module Planner shows a list of plans
- User requests to delete a specific plan in the list
-
NUS Module Planner deletes the plan
Use case ends.
Extensions
-
2a. The list is empty.
Use case ends.
-
3a. The given index is invalid.
-
3a1. NUS Module Planner shows an error message.
Use case resumes at step 2.
-
Use case: Add a module to semester
MSS
- User requests to add a module
-
NUS Module Planner shows result
Use case ends.
Extensions
-
2a. The given module number is already added.
- 2a1. NUS Module Planner shows an error message.
Use case ends.
-
3a. The given plan/semester number does not exist.
- 3a1. NUS Module Planner shows an error message.
Use case ends.
-
4a. The given module number does not exist.
- 4a1. NUS Module Planner shows an error message.
Use case ends.
-
5a. The given module number does not have its prerequisites met.
- 3a1. NUS Module Planner shows a warning prompt.
Use case ends.
Non-Functional Requirements
- Should work on any mainstream OS as long as it has Java
11or above installed. - Should be able to handle 25 modules without a noticeable sluggishness in performance for typical usage.
- A user with above average typing speed for regular English text (i.e. not code, not system admin commands) should be able to accomplish most of the tasks faster using commands than using the mouse.
- The system should be backward compatible with data produced by earlier versions of the system.
- The system should work on both 32-bit and 64-bit environments
- The system should respond within two seconds.
- The system should be usable by a novice who has never attended a single semester in NUS.
- The product should not be required to share data between users.
- The product should not be able to detect if the registered module is valid or available in NUS.
- The product will not support any other modules other than for NUS.
- The product should not contain all NUS modules as it is just a prototype.
Glossary
- Mainstream OS: Windows, Linux, Unix, OS-X
- NUS: National University of Singapore
- MCs: Module credits, usually 4 for each sem-long module
- Module: Classes for students in university. It has both a title and a module code
- Module prerequisite: Students must fulfill by passing the prerequisite modules before taking this module